DEBIT PERMISSIONS
When you rez your Server and touch, it asks to grant debit permission. You must grant them to have the server working.
MENU
 After granting debit permissions, you can touch the vendor and it will open a menu:
- load
Use this to load the product listing from the product list into the server memory.
During upload, the server will check the server inventory.
- Warnings show minor issues, that will not affect sales.
- Errors show major errors that prevent the product from being sold.
When you press load, the server will also load the configuration file and the language file.
You need to use the load button every time you changed either notecard of the server or if you added / replaced a texture.
Its highly recommended to verify a product list before you upload! - offline
Use this to set all of your vendors offline.
Offline vendors will not be able to load products, if the server is set to offline. - online
Use this to set the server online again and upload your products to all of your vendors.
If the server is already online, it will but update all vendors. - verify
Use this to check if a product list is consistent and would load without errors.
Its highly recommended to use this before you load a new product list.
- reconnect
Use this to obtain a new network address for your server and try to update all vendors with the new address. - remove
Removes all contents of the server inventory.
Inventory in the root prim stays untouched. - help
Presents a web link to this site.
CONFIGURATION NOTECARD
With this notecard you can set up several settings for the operation of the Server. All of these settings are optional. If you are unsure, just leave everything blank.
- SERVER ID: <ID of server>
You can manage independent sets of servers. This feature can be used to run different brands on different servers or to maintain a test installation to verify a new setup before you go online on the production system.
To link a vendor to a server with a specific server ID, add the Server Name tag to the vendors notecard: S:server-id:S
Capital letters are NOT allowed! - IM ON DELIVERY: Yes/No
If you want to receive an IM with sales details every sale, set this to Yes - if not: No - ANS URL: <url>
With ANS (Automatic Notification Support) you can use external systems to track your sales, show statistics and charts.
I recommend to check out the bdev Sales Data Metrix service, of Ty Brandenburg. It offers great ways to display your sales data and charts on a web server. One week trial is free! For a fee, you get lifetime access! - The pro-users, also might love to use the bdev visitor tracker!

PRODUCT LISTING NOTECARD
The product listing notecard for the products is a semicolon separated list that offers various options:
//Price;Product;(Group);(Tags);(Commission);(URL);(Notecard);(Texture)
 Options in brackets are optional and can be kept empty.
The descending order of the products in the list is
- Price:
Price of the product - Product:
Name of the product - Group (optional):
To organize your products in groups.
Every product can be a member od one group. - Tags (optional):
Comma separated list of tags.
Tags can be used to filter products. - Commission (optional):
Comma separated list with commission for this product to your partners:
[commission_1],[UUID_1],[commission_2],[UUID_2],..
You can list commission for several friends.
Commission can be a fixed value or a percentage.
Example:
10,f74221b6-cf3d-4b25-9065-ec6c264a6770
is L$ 10 commission to Mo Noel on every sale for this product
10%,f74221b6-cf3d-4b25-9065-ec6c264a6770
is 10% commission to Mo Noel on every sale for this product
- URL (optional):
URL with more product information - Notecard (optional):
Name of a notecard with product information.
If not set, SmartSearch will search for a matching notecard in the server inventory. - Texture (optional):
UUID of product texture - texture does not need to be in the inentory. If not set, SmartSearch will search for a matching notecard in the server inventory.
Naming conventions
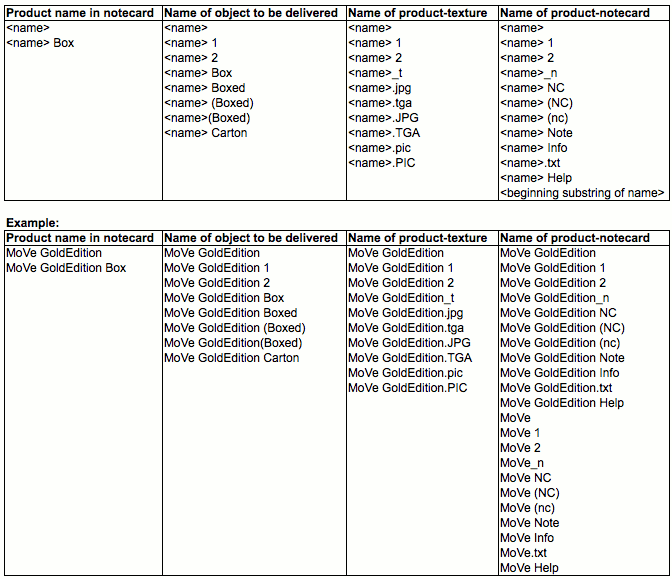
For most easy setup its recommended to choose the names for product-objects, product-texture and product-information-notecard like this:
- Object:
[ product name] Box
or
- Texture:
[product name]
- Notecard (optional)
[product name]Note [product name]
or
Info
or
(NC)
This way, MoVe SmartSearch will be able to find the matching items to every product.
However, MoVe will also work, if all items that belong to one product are named all the same. If all of your items have the same name, make sure not to add them the same time to the server, but add one after an other.
This is recommended, because SL will rename the item name and add an index to the name, like this:
[product name]
The MoVe System will detect this and will still work, its but for style reasons I recommend to take care to keep the names "clean".
IMPORTANT
DO NOT rename the linked prims of the MoVe! server!

